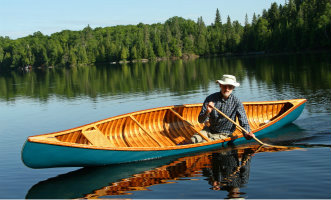


Racing Kayak Set Up
The bare minimum racing kayak set up is getting the distance between footrest and seat correct so that the legs are in the right position to enable a good paddling stroke. After that here are plenty of further enhancements needed to get your boat running just right and make sure you are sitting comfortably.
Seat and Footrest PositioningThe distance between your seat and footrest should be such that your legs are bent at roughly a 120 to 130 degree angle. Your knees need to be in the right position so that you can push through your legs on each stroke. A good rule of thumb is that when you push through your foot you should be able to just about straighten one leg at a time, but not both legs together, without feeling as though you are pushing yourself off the back of the seat. You should not actually straighten your leg when paddling but this rough set up should be a good starting point. Once you know how far you need between seat and footrest it’s a good idea to measure the distance. If you know the spacing it will make setting up unfamiliar K1’s or K2’s and K4’s much quicker and easier. At our club we have about 8 or 10 pieces of old white plastic curtain rail. Each piece has measurements on it like a giant ruler and a loop of cord. They hang up in the club and we encourage paddlers to remember their leg measurement. We the use these sticks to adjust seats and footrests to the right size before getting on the water. It helps sessions get going much more quickly! Typical measurements from footrest to front of seat are: 31” for 6’ paddler, 26” for 5‘ 4” paddler, however, individuals leg length to height ratio varies a lot so you need to check for yourself. TrimTo enable a racing kayak to be set up to run at its fastest you need to get your weight distributed along the length of the boat correctly. Boats run the fastest when they run level. If you are the right size for your boat both ends should be in the water by about the same amount. You will see a little lift of the bow under power but it should remain in the water, or maybe just lift out a tiny amount under full power. |
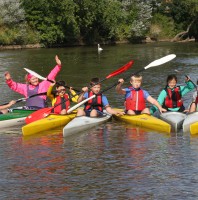
Marathon Racing
 Marathon Racing in a nutshell |

Start by putting your seat in the mid seat position with the footrest adjusted correctly for your leg position as explained above. Ask someone to take a look how the boat is sitting in the water from the side both when stationary and when paddling. Move the seat forward or backwards to get the front or back more or less in the water.
In crew boats you will need to carry out a similar exercise. If your weights are not the same lighter paddlers will need to sit well forward if sitting in the front and well back in the back. The opposite applies for heavier paddlers.
Seat Height and Angle
The seat height makes a massive difference to the stability of a boat. The higher the seat is set the higher the centre of gravity is moved and the more unstable the boat becomes. However, sitting low in a boat is not good for the best paddling position. A better paddling position is usually attained by having a slight angle with the back of the seat higher than the front and by getting the seat high enough above the level of the feet to enable the paddler to sit upright or with a slight forward lean from the hips. Shorter paddlers will also find that sitting too low in a boat that is a bit too big for them makes it difficult to reach smoothly over the cockpit to perform a good clean stroke.
If you are looking for stability take a look at the height of the platform in the boat as well as the height of the seat. It is the combination that affects how high you sit.
Padded or Slippy Seat?
This is where opinions vary wildly. Some top class athletes and coaches will say that you should not have a padded seat and that you need to be able to rotate on the slippy surface of the seat. Others like to have a layer of some sort of closed cell foam on their seat to provide some padding and also to provide a certain amount of grip and contact with the seat. Others have methods of providing a slippy surface on their padding. A thin plastic carrier bag over the top of the padding works well for some.
For those who don’t have any padding splashing a little water on the seat provides a little bit of grip which some like or some have sticky mesh. You’ll have to work out for yourself what works best for you.
If you do want to put foam on your seat try to choose a foam that has a bit of a shine to its surface and is not too grippy. Most people who use padding prefer to cut holes for the cheeks of their backside to sit into. Choose your glue carefully as some will melt the foam.
Footrest and Pull Bars
Kayaks come with different types of footrest. The bare minimum is a flat piece of wood, aluminium or other material about 2 to 4 inches deep with a slot for the rudder. Some people prefer a deeper footrest that is referred to as a full plate footrest and fills the hull shape with a flat surface that the feet can push against. This allows the whole foot to be used.
A pull bar is a further addition to the footrest. Not all racing kayaks are set up with a pull bar but above a ceratin level they are almost an essential addition. They enable an opposing force to be applied by the foot that is not providing leg drive and also provides another point of contact that improves stability when it gets choppy! The pull bar needs to be adjusted to just touch the toes. Some pull bars are flat or round pieces of tubing or aluminium which generally are more comfortable if wrapped in some neoprene or other soft light material. Much loved by many sprinters are the moulded carbon pull bars sold by the kayak manufacturers. They are very light and nicely shaped to fit the feet.
Finally there are footstraps. These are less common and more difficult to slip in and out of. A piece of webbing loops across the foot. They create a good snug fit but need to be wriggled into, not ideal for marathon racing when getting back in quickly after a portage.
Foot PumpsThose who plan on marathon racing will eventually realise that a footpump is pretty essential for longer races. The pump is fitted into or onto the footrest so that it can be activated by the feet. Before attaching you need to think hard about where you want it to go. If it goes directly under the place where your feet naturally sit you will be pumping on every leg drive. You boat will be dry but you will wear the pumps rubber out quite quickly and you may not like the resistance of the pump on each leg drive. Alternatively you can fit the pump in a position that you need to move your feet to. The question is can you then pump and paddle effectively when needed? There is no right or wrong answer just alternatives. Make sure the pick up for the pump is situated where the water lies! If you paddle a K2 and you have a heavy paddler in the back and the water runs that way however well you trim the boat there is no point in putting the pick up for the pump near the front of the boat! Likewise if there are any fittings that stop water from running from front to back make sure the water can get to the pump pick up. Poor foot pump set up in marathon racing kayaks is an eternal frustration of coaches who end up trying to sort out problems with broken pumps on race day for their athletes. Getting the boat well dried out and doing a good job of fitting the pick up and pump mechanisms well in advance and then testing them can reduce a lot of stress on race day. |
Rudder and Rudder WiresThere are two main types of rudder, understern and overstern. Overstern rudders are mounted in the stern of the boat and the wires run along the top of the deck then go through under the deck and inside the kayak to the foot operated rudder mechanism. The rudder is on a hinge and if it hits rock, the bottom of the river or any other obstacle it lifts up on the hinge and is therefore not damaged. Understern rudders are mounted under the kayak about 18 inches from the stern. There is no mechanism to protect the rudder from damage in the event of hitting an obstacle so they are not suitable for shallow rivers or shooting weirs. The rudder is mounted on a piece of stainless steel rod which come up through a specially designed rudder mounting to a rudder wheel to which the wires are attached. All of this is accessed through a small rudder hatch on the deck of the boat. The understern rudders are used on sprint boats and on many marathon boats that are used primarily on deep water courses. They are generally thought to provide better control although the South Africans who use oversterns extensively for descent racing can also be seen racing them sucessfully on deep water marathons. There are two shapes of understern rudder, swept back and deeper more vertical. The deeper more vertical rudders are often considered to be sprint rudders. They are more vulnerable to damage. They also have a habit of picking up weed. In both cases watch out for the effect of a hard knock to the rudder. This can lead to the rudder bending up towards the boat. It may then start catching on the hull of the boat when in the middle straight line position. When this happens the boat can be very difficult to steer and a replacement may be necessary if it cannot be bent back without breaking or weakening it. Rudder wires do not last forever. If you never check them one day a wire will break or come loose just when you least want it to. Check the most likely points where the wires might weaken, this would be anywhere where they rub or bend around a corner. In addition the rudder wheels sometimes need attention. Depending on the make they may wear where the rudder stem comes up through the hull of the boats and the rudder wheel is attached. Take the rudder hatch off occasionally and check that it all looks OK. To adjust the wires if the steering is out loosen the wires off then set the rudder in the middle of the bottom of the boat on the outside and then set the rudder stick to the centre. Now tighten up the wires. This is much easier done with two people. |
 Overstern rudder Overstern rudder Various understern rudders, the biggest for K2, two shapes for K1 Various understern rudders, the biggest for K2, two shapes for K1 Understern with deck hatch for access Understern with deck hatch for access |
Handles for PortagingSome people are happy portaging without handles, however, something to get a good firm grip of can make all the difference to everyone from weak tired novice to elite competitor. K2K2 handles are often mounted at the bow and stern and there is little chance to retro fit them after manufacture as access is too difficult. In this position they are used for longer runs either held downwards on the arms or upside down using the handle to keep the boat secure on the shoulder. An alternative is to locate handles with one in the centre of the boat just in front of the front cockpit and one on either side just behind the back cockpit. This can be a very successful set up for shorter runs where the handles can be quickly reached and carried on the arms with confidence. K1The older wider style of K1 had a good bit of cockpit for the paddler to grip which was ideal for lifting the boat and portaging. The newer skinny designs (which are not really new any more!) have little for the paddler to grip and as a result many paddlers who portage regularly fit handles. There are a variety of different styles from pieces of hosepipe (alone or covering a rope core), webbing to various cupboard handles from hardware stores. You will find a lot of interesting home designs. Take a look and decide what suits you best. Some eg rope based models swing a lot, fixed moulded handles are firm and easy to control but can be bulky, our favourite it webbing fairly tight for minimal swing but very light and with little bulk. When fitting find the balance point that you want to be using to carry the boat, drill through the boat (at your own risk!) and use good wide washers on both sides of the holes to distribute the load of whatever you attach. Some paddlers who shoulder their boats to portage only have one handle on the side they always use. Before drilling make sure the fitting you are adding will not be in the way when you are sitting in the boat paddling. Final Racing Kayak Set Up Tips |
 Handles in use at World Champs Porto 2009 Handles in use at World Champs Porto 2009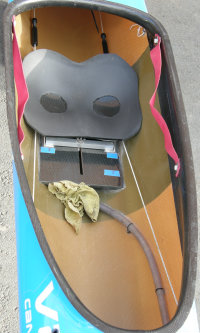 K1 set up with webbing handles & foot pump pick up under seat. K1 set up with webbing handles & foot pump pick up under seat. |
Handles for Portaging
Some people are happy portaging without handles, however, something to get a good firm grip of can make all the difference to everyone from weak tired novice to elite competitor.
K2
K2 handles are often mounted at the bow and stern and there is little chance to retro fit them after manufacture as access is too difficult. In this position they are used for longer runs either held downwards on the arms or upside down using the handle to keep the boat secure on the shoulder.
An alternative is to locate handles with one in the
centre of the boat just in front of the front cockpit and one on either
side just behind the back cockpit. This can be a very successful set up
for shorter runs where the handles can be quickly reached and carried on
the arms with confidence.
Handles in use at World Champs Porto 2009K1
The older wider style of K1 had a good bit of cockpit for the paddler to grip which was ideal for lifting the boat and portaging. The newer skinny designs (which are not really new any more!) have little for the paddler to grip and as a result many paddlers who portage regularly fit handles. There are a variety of different styles from pieces of hosepipe (alone or covering a rope core), webbing to various cupboard handles from hardware stores. You will find a lot of interesting home designs. Take a look and decide what suits you best. Some eg rope based models swing a lot, fixed moulded handles are firm and easy to control but can be bulky, our favourite it webbing fairly tight for minimal swing but very light and with little bulk.
When fitting find the balance point that you want to be using to carry the boat, drill through the boat (at your own risk!) and use good wide washers on both sides of the holes to distribute the load of whatever you attach. Some paddlers who shoulder their boats to portage only have one handle on the side they always use. Before drilling make sure the fitting you are adding will not be in the way when you are sitting in the boat paddling.
K1 set up with webbing handles & foot pump pick up under seat.Final Racing Kayak Set Up Tips
Beware how much weight you add to your kayak. All fittings add a little weight and it can add up. In Sprint boats this is not usually an issue. Lighter /weaker paddlers involved in marathon and doing a lot of portaging will see a huge benefit from keeping the weight of the boat down especially on races with a lot of, or long portages. Consider using nylon nuts and bolts rather than stainless steel. Look at how heavy the seat and its fitting are. Heavier paddlers may need heavy gauge materials for strength whilst lighter paddlers may be able to go for something a bit lighter.
Finally - don't change your settings without testing them before you race. Race day is not the day to be fiddling around with racing kayak set up. It should all have been done and tested well in advance!
- Home
- Kayaks
- Racing Kayak
- Racing Kayak Set Up